
Instagram is one of the most popular photo-sharing platforms nowadays. There are millions of users who are using this platform to share photos. Instagram is mostly popular because of celebrities. The Instagram app is available for both Android and iOS smartphones. But, if you want to use Instagram on your PC, there are ways to do that. However, when you use Instagram on your PC through the official Instagram website, you’ll probably notice that there are no photo upload options are available. So, in this post, we’ll share the method to upload photos to Instagram from PC. You can use this method to upload the photos on this photo-sharing platform from your PC.
Although the Instagram web version provides most of the features like view photos, follow, unfollow, view stories, edit profile, etc, there is no option to upload photos to Instagram from PC. That doesn’t make sense right? Because most people use Instagram to share their photos. But, if you are using it on your PC or Laptop, you don’t get the photo upload option that you should have. Well, we don’t know why Instagram has disabled this option for the PC users. They might want to promote the official Instagram app hence, recommending it to use on your smartphone. But, don’t worry if you want to upload photos to Instagram from PC. Below, we’ve shared the method to do that.
Upload Photos to Instagram from PC in 2020
As I said earlier, Instagram is one of the most popular photo-sharing platforms nowadays. And if you use your PC or Laptop more than your smartphone, you should properly use the Instagram web version on your PC. Well, there are many people who use Instagram just for marketing. So, it’s important to get the same features of Instagram mobile on the PC version of this photo-sharing app.
Well, on the PC or web version of Instagram, you get most of the features of the mobile version of this app, except the photo upload feature. Suppose you want to upload photos to your Instagram profile from your PC or laptop, and when you open Instagram.com in your browser, you don’t find the option. So, it is annoying when you want to use the most useful feature of a platform but can’t find it on the PC version itself. Also, if you have a picture on your PC, want to upload it directly from your PC on Instagram, you can’t do that. Simply because there are no such options are available on the PC version of this popular photo-sharing platform.
There are many benefits of using Instagram on your PC. The first benefit that you’ll get is some extra battery life of your smartphone. Instagram is a heavy battery eating app for smartphones. So, if you use it a lot, you should choose to use Instagram on your PC. It’ll help you to save the battery life of your smartphone. You can use it for hours without worrying about charging your smartphone. However, if you are using a Laptop, you might need to charge your laptop after 2-3 hours of use, depends of the average battery life of your laptop.
The next thing that’ll give you benefit is viewing photos on a big screen. If you have ever used the Instagram web version on your computer or laptop, you probably know how cool it is to browse Instagram on PC and view the photos posted by different Instagrammers. Using it on a big screen like a PC or laptop will give you a totally different experience. And you won’t get it on the mobile version of Instagram.
Now you know why you should use Instagram on your PC. But, how can you use it? Well, there are different methods to use Instagram on PC. But, the easiest method is to go to instagram.com on your PC and then sign in to your existing Instagram account. The web version of Instagram is accessible from almost every PC browser. And you can manage your Instagram profile directly from your PC. The PC version of Instagram has similar features. So, you don’t have to worry about the user experience. You can easily access most of the features on the web version.
But, the main problem with the Instagram web is, it doesn’t have any photo upload feature. Well, the web version of Instagram has all the features excluding the photo upload feature. So, you don’t get the main primary feature of Instagram on the web version. However, you can still view the photos, follow-unfollow people’s, search for any profile on the web version. But, as the upload option is not available, it’s not completed. Although there’s an option to upload IGTV videos on the web version of Instagram, the photo uploading option is not available.
But don’t worry. Because we have described the method to upload photos to Instagram from PC below. Using this method, you can easily upload your favorite photos from your PC directly to this popular photo-sharing platform. There are different methods to upload photos from the PC. But, we’ve described the easiest methods to do the work. So, if you are looking for a way to upload the photos on Instagram from your PC or laptop, then you can follow the guide below. It’ll definitely work and you’ll be able to upload the photos without any issue.
Using this method, you’ll be able to upload any photos directly from your PC on Instagram. And it’ll allow you to use all the features of Instagram properly on your PC. So, if you spend a lot of time on Instagram, then it’ll help you a lot. Because the method will make the Instagram web look like Instagram mobile. And you’ll be able to use all the features as you use them on the Instagram mobile app. You can upload any photo or video you want from your PC on Instagram if you follow the steps correctly. So, without talking about anything, let’s find out how you can upload photos to Instagram from PC easily.
How to Upload Photos to Instagram from PC?
1. Use Instagram Web
This method is the easiest if you want to upload the photos on Instagram from your PC. You just need to use your Chrome browser to do the work. It makes the web interface of Instagram looks like the Instagram app. So, you’ll get the option to upload photos on the web platform. And you can use it to upload the photos easily on your PC. In this method, you just need to open the Instagram official website in the Google Chrome browser. And then, you need to tweak some things.
We have described the complete process below. So, you can follow the steps to upload photos on Instagram from your PC successfully. Although the Google Chrome browser is recommended, you can use other browsers as well. And it’s absolutely safe to upload the photos on Instagram from your PC using this method. You don’t need to use any 3rd party software on your PC to upload your favorite photos. Just your regular browser will do the work for you. So, follow the below steps to upload photos on Instagram from your PC.
How to Upload Photos to Instagram from Google Chrome?
- First of all, open the Google Chrome browser on your PC. Make sure the Chrome browser is updated to the latest version.
- Now, open instagram.com on your Chrome browser and open the web version of Instagram on Chrome.
- You’ll get the option to sign in to your Instagram account. Just enter your Instagram username and password and you’ll be able to login successfully into your Instagram account on the web version.
- When you successfully log into your account, just go to the profile section of the Instagram web.
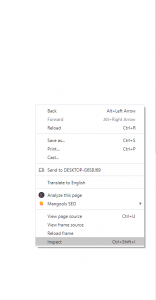
- Now, here comes the tricky part. Right-click on anywhere on the screen and select ‘Inspect Element’ from there. You can also use the shortcut Ctrl+Shift+I to open the Inspect element console on the Google Chrome browser.
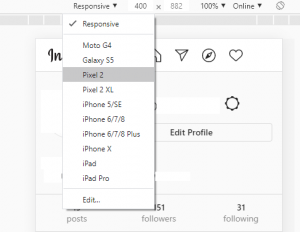
- From the right panel, you’ll find a mobile icon named ‘Toggle device toolbar’ option. Click on it. It’ll be located on the top-left corner of the main Inspect Element console.

- Now, go the left console, and click on the ‘Responsive’ option from the upper left corner. When you click on this option, a dropdown menu will be opened. Now select any device from the list and refresh this page.
- That’s it. After refreshing the page, it’ll load it as your selected mobile page. So, you’ll automatically get the upload button on Instagram.

As you can see, this method is very easy and safe. You just need to do a couple of clicks on the Chrome browser to get the upload button on Instagram PC. However, this method also has some cons. Because you won’t see the web interface after selecting the device. Because it’ll load it as the Instagram mobile app.
2. Use Android Emulator
The alternative method that you can use to upload the photos on Instagram from your PC is by using an Android emulator. This method is a little bit complex. Because, in this method, you have to install an Android emulator first on your PC. And then, you have to install the Instagram mobile application on the Emulator. By doing this, you’ll be able to use all the features of Instagram mobile on your PC including the photo uploading feature. So, if you want to use the mobile version of Instagram on your PC, this method will be useful for you. However, using an Android emulator on your PC comes with some limitations.
Because you need a decent PC with decent RAM and Processor to use the emulator on your PC. So, if you have an average PC, the emulator might lag on the PC. This is the reason it’s the best option to follow the previous method on your PC to upload the photos on Instagram. However, if you still choose to use Instagram mobile on your PC using the Android emulator, you can follow the method below. We have described the step by step guide to install Instagram mobile on your PC below. Just follow the steps correctly to use it.
How to Install Instagram Mobile on PC and Upload Photos?
- The first thing you need to do in this method is to download an Android emulator on your PC. There are many Android emulators are available. You can use any of them. For this particular guide, we recommend using Bluestacks Android emulator on your PC.
- Download the Bluestacks Android emulator and install it on your PC.
- Now, download the latest version of Instagram apk.
- Then, install the Instagram apk file on your PC using Bluestacks.
- Now, open the Bluestacks app player on your PC and you’ll find the Instagram app in the app drawer of this emulator.
- Click on it to run Instagram on your PC.
- When the app opens, just sign in using your existing Instagram account or just create a new account there.
That’s it. Now, you’ll be able to use all the features of Instagram mobile on your PC. It includes uploading any photo from your PC to Instagram.
Although this method is not recommended, if you want to use the same mobile Interface of Instagram that you use on your smartphone, you can give it a try.
Read Also: Download YouTube Videos on PC
Final Words
So, guys, I hope you liked this guide. If you liked, you can share it with your friends and family on social media platforms and tell them how they can upload their photos to Instagram from their PC. Just use the share buttons below to share this guide. Both the method described above is working methods. So, you can choose any of them to upload the photos from your PC. If you have any questions or queries regarding this post, you can ask them in the comment section below. And we’ll try to help you. If you want to give any suggestion, you can also provide it in the comment section below.


")


