
Sometimes, we need to take a screenshot of our Windows 10 desktop for various purposes. But, if you are not familiar with taking Screenshots on your Windows PC, then it might difficult for you. You may end up downloading 3rd party Softwares just to capture a simple desktop screenshot. But, let me tell you that you don’t’ need any kind of additional tool to take a screenshot on your Windows PC. Windows already has a built-in screenshot tool that you can use to take the screenshots. If you want to how then you have come to the right place. In this post, we’re going to share some of the popular methods to take a screenshot on Windows 10.
You can easily take the screenshots without downloading any third-party tool. Because there are already screenshot tools are installed on Windows 10. So, you don’t have to install any 3rd party software. Although, you can always use a 3rd party software to take the screenshot on your Windows PC. But, if you don’t want to waste your time installing the software and taking a screenshot, you can use the built-in screenshot tool of Windows to take the screenshots. This tool is available on Windows 7,8,8.1, and Windows 10. So, no matter which version of Windows you are using, there’s always a simple way to capture a screenshot on your Windows PC.
Why do You Need to Take Screenshot on Windows 10?
There can be several reasons why you need to take a screenshot on your PC. And as Windows is the most popular operating system in the PC industry, we are going to share Windows screenshot taking methods with you. You can take screenshots to capture any vital information from your PC. After capturing an image or screenshot of the information from your PC, it becomes an archive. So, you can open it anytime and get the information.
For example, As we know, social media platforms are very popular nowadays. So, you are browsing Facebook or Reddit on your PC. And suddenly you found a post that’s interesting. And you need to save it. So, how should you save a post from social media? One method is to copy the post and paste it in notepad. But, if the post contains an image, the notepad method doesn’t work at all. Another example is, after capturing the information, you can print it and make a physical copy of the post or any information that you saved from your social media profile.
There can be other reasons also. So, in the end, screenshot taking is very important to store information. And you can save Facebook posts, chats, and other stuff in an image by taking the screenshot of it. However, those who are not familiar with taking screenshots in Windows can face problems when they need to take an urgent screenshot. They might not know that Windows has built-in tools to capture the screenshot. That’s why I’m writing this guide. In this guide, I’ll share different methods to take a screenshot on Windows 10. Although these methods will also work on the other version of Windows too.
How to Take Screenshot on Windows 10?
1. Using PrtScr
This is one of the easiest methods that you can use to take screenshots. However, using this method, you can only capture a full-screen screenshot. That means the captured screenshot will have your full desktop screen. But, you can cut it later and take the portion that you only want. Although the process is a little bit complicated. In simple words, if you want to take a full-screen screenshot, this method is very effective. If you want to take a screenshot of a selected portion of your screen, you can try the next method of this post.
Now coming to the method. You probably have heard of hotkeys or shortcut keys. Shortcut keys are those keys that run a program or any shortcut when you press them. And Windows already have a lot of these shortcut keys. There are several shortcut keys are available on Windows that you can use to open a program or shortcut quickly on your PC. You can use these keys to save time. If you want to run a specific program, instead of navigating mouse to the programs and open it, you can simply press the hotkey to run the program. And as I Said, Windows already has a lot of these keys.
So, we are talking about a special shortcut key that’ll help us to capture a screenshot on any Windows machine. You can follow the below process to get a step by step guide.
How to Use Shortcut Keys to Take Screenshot on Windows?
The process of taking screenshots with Windows shortcut keys are pretty simple and straightforward. You just need to press two keys of your keyboard to take a screenshot. And here is the process:
Press Windows Key+PrtScr(Print Screen) key at the same time to capture a screenshot on your Windows PC.
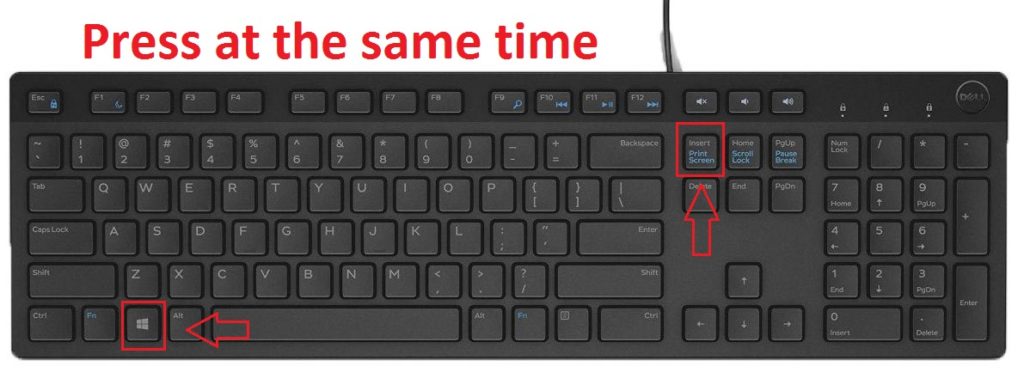
It’ll instantly capture a screenshot.
You can find the screenshot in This PC>Pictures>Screenshots folder. So, you can just cut or copy the screenshot from the folder and paste it anywhere you want. Isn’t it an easy process? Because you just need to press only two keys at a time to take the screenshot. I’m sure that that you have liked this method of taking a screenshot on your Windows PC. And it is probably the easiest method.
However, this method also has a flaw. Because, when you use the shortcuts to take the screenshot, it captures a full-screen screenshot of your desktop. So, if you want to capture a special part (Like a social media post) of your desktop, you can’t do that. Because of this reason, using shortcut keys to capture screenshot isn’t a perfect method. However, if you want to stick with this method, then there’s a way that you can use it to capture a special portion.
You can simply edit the captured screenshot in Windows paint and crop the section that you need. It’ll help you to capture the part that you need.
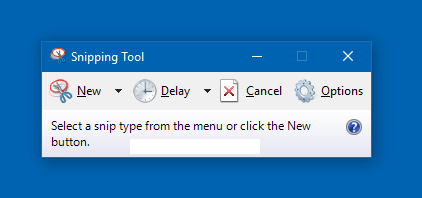
2. Using the Windows Snipping Tool
This is probably the most popular method to take a screenshot on Windows 10. Because, using this method, you can not only capture the whole screen, but you can also select the area that you want to capture and take the screenshot. Because in this method we are going to use a screenshot capture tool. But wait, I said we are not going to use any 3rd party tool. So, how can you capture a screenshot on Windows without using a 3rd party tool?
Well, because Windows already has a built-in tool that’ll help you to capture the screenshot. Windows snipping tool is the tool that you can use to take the screenshot. Although it is an inbuilt tool from Windows, the tool is pretty powerful. Because, you get a lot of features that you can use to customize the screenshot on your Windows PC. These features include delay settings in the screenshot, edit the screenshot after taking, remove or draw anything on the captured screenshot, etc. Many users don’t know about this tool. But, the Windows snipping tool is probably the best screenshot capturing tool for Windows.
This tool has a pretty simple and straightforward process. So, anyone can easily capture the screenshot on their Windows PC using the snipping tool. And as it is an official software from Microsoft, it’s completely safe to use. Plus, you can take screenshots as you like. For example, if you want to take a rectangular screenshot or a free shape screenshot, you can do that with the Snipping Tool. Because of these features, the Snipping tool is the most popular method to capture screenshots on your Windows PC.
How to Use Windows Snipping Tool to Capture Screenshot?
It is very easy to take the screenshots on your Windows PC using the Snipping tool. Just follow the process below to take the screenshot.
- First of all, go to the Windows search bar from the taskbar of your Windows. And type ‘Snipping Tool’ in the search bar.
- It’ll display the tool. Click on it to open.
- Now, you’ll see the Windows snipping tool. To take a new screenshot, click on ‘New’.
- Now, move your cursor to the area that you want to capture. By default, it captures a rectangular screenshot. So, you can change it from the ‘New’ dropdown menu.

- If you want to take a full-screen screenshot, you can select ‘Full-Screen Snip’ from the dropdown menu and it’ll take a full-screen screenshot instantly.
- After capturing the screenshot, you can use the editor to modify the screenshot.
- Click on the Save button when you are done. And it’ll save the screenshot. You can also choose different file formats and the location while saving the screenshot.
So, guys, as you can see, it is very easy to take the screenshot using the snipping tool on your Windows PC. This is the reason Windows users love the snipping tool so much. When you have this tool, you don’t have to use any 3rd party screen capturing software.
3. Taking Screenshot on Chrome
Although you can use the above two methods to take a screenshot anywhere on your screen, if you want to take a quick screenshot in Google Chrome, then this method will be helpful to you. Because, in this method, you can take a screenshot of your Chrome browser easily. If you don’t want to use the snipping tool because it takes time to open the tool, you can use a chrome extension to capture screenshot from Google chrome. And it’s a very easy process.
You probably know about Google Chrome extensions. Google Chrome extensions are apps or plugins that helps you to do several things on your Chrome browser. So, if you want to take a screenshot on your Chrome browser, there are many extensions that doe’s the job. Using these extensions, you can capture the screen of your Chrome browser easily. And these extension offers both full-screen capture and particular area capture. So, you can use these chrome extensions to capture your browser Window as you want. It’ll help you to capture the Chrome area that you need the most.
Although there are many screens capturing extensions are available for Google Chrome, you can use Full Page Screenshot extension to capture the screenshots. This Chrome extension offers several features that you can use while capturing your Chrome browser window. And it also runs in offline mode. So, if you are experimenting with any HTML file or other things in your Chrome browser, you can take a screenshot at that time. After capturing the Chrome window, you can easily save the file as .png file format in one click. Overall, it’s very easy to use the Full Page Screenshot extension on your Google Chrome browser.
How to Use Chrome Extension to Capture?


- First of all, download the Full Page Screenshot extension for your Chrome browser from the link below.
[su_button url=”https://chrome.google.com/webstore/detail/full-page-screenshot/glgomjpomoahpeekneidkinhcfjnnhmb?hl=en” target=”blank” size=”10″ radius=”0″ icon=”icon: download” rel=”nofollow”]Download Now[/su_button]
- When it finishes downloading, you’ll find the extension in the extension bar of your Chrome browser.
- Now, when you want to capture a screenshot, just click on the extension.
- Select the area that you want to capture and it’ll capture the selected area instantly.
- That’s it! Now, you can save the screenshot image anywhere you want and use it later.
If you use the Google Chrome browser regularly to use social media platforms, then getting the screen capturing extension will be very helpful to you. Because you can quickly access it from your Chrome extension bar and take the screenshot. It’ll help you to take a screenshot when you need it. So, you don’t have to use any 3rd party tool in this method. And this method is pretty practical.
Final Words
So, guys, I hope you liked this post. If you liked, you can share it with your friends on social media platforms. Just use the share buttons below to share this post. If you have any questions or queries, you can ask them in the comment section below. And we’ll try to help you. You can also provide your feedback in the comment section.


")


