
Are you facing a camera not working issue on your Android device? If yes, then you just have come to the right place. There are many Android users who often face camera issues on their Android devices. And if you are facing the issue right now, then you can fix it easily. There are different ways to fix the camera of your Android device and make it work again. Below, we have described the process to do that. So, you can just follow the process to fix the camera issue on your Android device and capture photo or record videos with the camera app.
The android camera is a necessary feature that Android users use. However, when they face a camera not working issue on their Android device, it gets really annoying. Suppose you want to take a picture and you open the camera app of your device. But, the camera app simply doesn’t open. It can show various errors like ‘camera stopped working’ or ‘camera is used by other apps. However, there are different ways to fix this issue. And you can do that easily. You just have to follow the below guide to do that. Just follow the guide below, and you’ll be able to fix the camera of your device.
How to Fix Camera Not Working Error on Android Device?
1. Restart Your Device
The first thing that you need to do when you face the camera not working issue on your Android device is, you should restart your device. Restarting the device may solve the problem. Because, if the camera app is unable to work due to different processes on your Android device, it’ll close the process when you restart your Android device. So, the first thing that you need to do is to restart your Android device and check if the camera is working or not.
2. Check Camera Sensor
The camera not working issue of your Android device could be due to the season of the device. If the camera sensor of your Android smartphone or tablet isn’t working properly, then you can face a camera error. So, you have to check if the camera sensor is working or not. There are various ways to check the camera sensor of your device. Below, we have described the easy and simple way to do that. So, you can just follow the process below to check if the camera sensor of the device is working properly or not.
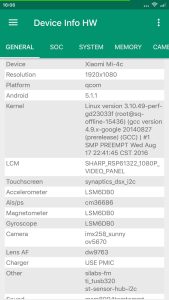
- First of all, you have to download the Device Info HW app on your Android device. It is a free app that you can use to check the hardware configuration of your Android device. You can download it and check various things including the camera of your device.
- After downloading, install and open the app.
- Grant all the permissions.
- Now, check the camera section in the app and check if it’s showing the camera sensor name or not. If the camera sensor of your device is not working, it’ll not show the sensor name.
So, you can check the camera sensor with these simple steps. If the camera sensor of your device is working properly, you can go ahead and follow the other steps below. However, if it does not show the camera sensor, you might have to replace it. For that, you can go to the service center and ask experts to replace the camera sensor of the device.
3. Use 3rd Party Camera Apps
Another way to check if the camera hardware of your device is good or not is, you can get a 3rd party camera app on your Android device, and check it easily. Maybe the issue is with the stock camera app of your Android device and because of this, you are facing a camera not working issue on your device. So, one of the best ways to check it is by using a 3rd party camera app on your Android device. If the 3rd party camera app displays the camera, that means, there are issues with the stock camera app on your Android device. So, you can check it easily by downloading and using a 3rd party camera app on your Android smartphone or tablet.
There are many 3rd party camera apps are available for Android smartphones and tablets. You can get any of them and check if the camera of your device is working or not. And the best part is, you can get the camera apps for free on your Android device. So, you don’t have to spend money and get a camera app on your Android device. Just download a 3rd party camera app on your device, open it and check if it’s working or not. On a 3rd party camera app, you’ll get more features than a regular stock camera apps. So, you can use it as your default camera app as well.
4. Uninstall 3rd Party Apps
If you have recently installed an app on your Android device, and after installing the app, you are facing the camera not working problem, then you should uninstall the app and check. Sometimes, users install 3rd party malicious apps on their devices. And it can cause various apps to stop working including harming your privacy. So, just uninstall the app that you have recently installed from your device and check if the camera is working or not. If it does, you are good to go.
5. Clear Recent Apps and Free Up Memory
![]()
If you are using an Android device with low RAM, then you can face a camera not opening or a crashing issue on your Android device. So, you have to clear the RAM of your device to let the camera app work properly. To clear the RAM, you can simply clear recent apps on your Android device. Or if it doesn’t work, you can use a RAM cleaner app on your Android device, and clean the RAM. There are various types of RAM cleaner apps like Auto Optimizer Pro are available for Android. So, you can choose any of them, and clear the RAM of your device.
6. Free Up Storage
You can also try clearing the internal storage of your Android device and see if the camera is working or not. Especially if you are using an Android device with low storage, then you have to clear the storage to fix the camera. For that, you can use a storage cleaner app and clear the storage. You can also use the file manager of your Android device and delete files with large sizes. So, just delete the storage and check if the camera is working or not on your Android smartphone or tablet.
7. Cool Down Android Device
Many Android users have reported that when they use the camera app of the device when the temperature of the device is high, the camera doesn’t work. Especially if you are using an Android device from Xiaomi, you can face this issue. So, you have to let your device cool down and then try opening the camera app of your device. If you are using any case on your device, just remove the case and let your device cool down. This may solve the issue and you can use your camera app again without any issues.
8. Check Camera Permission
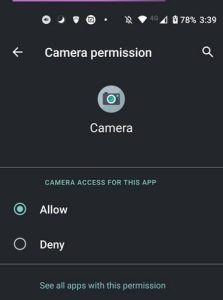
If there’s an issue with the camera permission of your Android device, then the camera app will not work. So, you have to check the camera permission and grant the camera permission on your Android device. You can do that easily without any issues. The camera app needs special permission to work on your Android smartphone or tablet. Now, sometimes, due to many issues, it doesn’t get permission. So, you have to check if it’s getting the camera permission on your Android device and then try opening the camera app.
You can just follow the below steps to grant camera app permission. Below, we have described the process step by step. So, you can just follow it and use the camera of your device without any issues.
- First of all, open the Settings option on your Android device.
- Now, go to the App Management Option from the Settings.
- Click on ‘App List’ and click on the Camera app from there.
- Now, click on the ‘Permissions’ option and you’ll see which permissions the camera app is getting.
- If it doesn’t show Camera permission, just click on Camera permission and grant the permission for the camera app.
That’s it. Now, check the camera and see if it’s working or not.
9. Clear Cache and Data of Camera App
You can also try clearing the cache and the data of the stock camera app and see if the camera of your device is working or not. Sometimes, the camera app of your Android device might not work due to the cache issue of the device. So, you can try clearing the cache and see if it works or not. Along with clearing the cache, you can also clear the camera data to make sure it works. This method is really effective if you face a camera not working issue on your Android device.
Below, we have described how you can clear the cache and data of the camera app. So, you can just follow the process and do that easily without any issues.
![]()
- First of all, open the Settings option on your Android device.
- Now, go to the App Management option from there.
- Click on App List and open the app list.
- Now, select the camera app from there.
- You’ll get the option to clear cache and clear data of the camera app. So, clear the cache and data.
That’s it. Now, open the camera app and see if it’s working or not.
10. Update Your Android Device
Sometimes, after an OS update, users face the camera not working issue on their Android device. If the camera issue on your device is occurring after an update, you can check for an update and see if it fixes the issue. Android manufacturers release frequent updates to fix various bugs on Android devices. So, you can go to About Phone>Check for Updates and see if there’s any latest update available. If you see there’s an update available, you can update your device and see if the camera is working or not
11. Reset Your Android Device
Last, but not least method that you can try to fix the camera not working issue on Android is, you can reset your Android device. Resetting your Android device resets the settings and files of your device. So, there’s any internal software issue with the camera of your device, you can fix it by resetting the device. This is the ultimate solution that you can try to fix the camera issue on your Android smartphone or tablet. So, just reset the device and you’ll be able to fix the issue easily.
There are mainly two ways to reset your Android device. You can either use the Settings option of your device, or you can reset the device from the recovery mode of the device. If you choose to reset it via Settings, you can go to the Settings option of the device and go to the Backup and Reset option. From there, you can choose complete reset. If you want to reset your Android device from recovery mode, you have to boot your device in recovery mode. You can press the Volume Up+Power Button and boot your device in recovery mode. Now, reset your device from there.
Final Words
So, guys, I hope you have found this guide helpful. If you liked this guide, you can share this guide on your social media platforms. Just use the share buttons below to share this guide. Above, we have tried to describe how you can fix the camera of your device and capture photos easily with it. Just follow the step-by-step guide that we have described, and you’ll be able to it easily without any issues. If you have any questions or queries regarding this guide, you can comment down in the comment section below. You can also provide your feedback in the comment section below.


")


