
Want to change the MAC address of your Android device? If yes, then you just have come to the right place. Every device that has a Wi-fi connection in it, has a special and unique MAC Address. For device devices, the MAC address is different. For Android smartphones and tablets, it is preset as well. And there are many users who want to change this unique address on their Android devices. So, if you want to do the same, just follow the below process. And you’ll be able to change the MAC address of your device easily.
It’s not that hard to change the MAC address of an Android device. You can do that in many ways. No matter if you are using a rooted or non-rooted Android device, you can always change the address and set a new address anytime you want. And that won’t affect the performance of your device. So, there are many benefits that you’ll get when you are changing the MAC address of your device. Below, we have described some of the benefits along with the methods. You can follow them and change the MAC address of your device easily.
Table of Contents
What is a MAC Address?
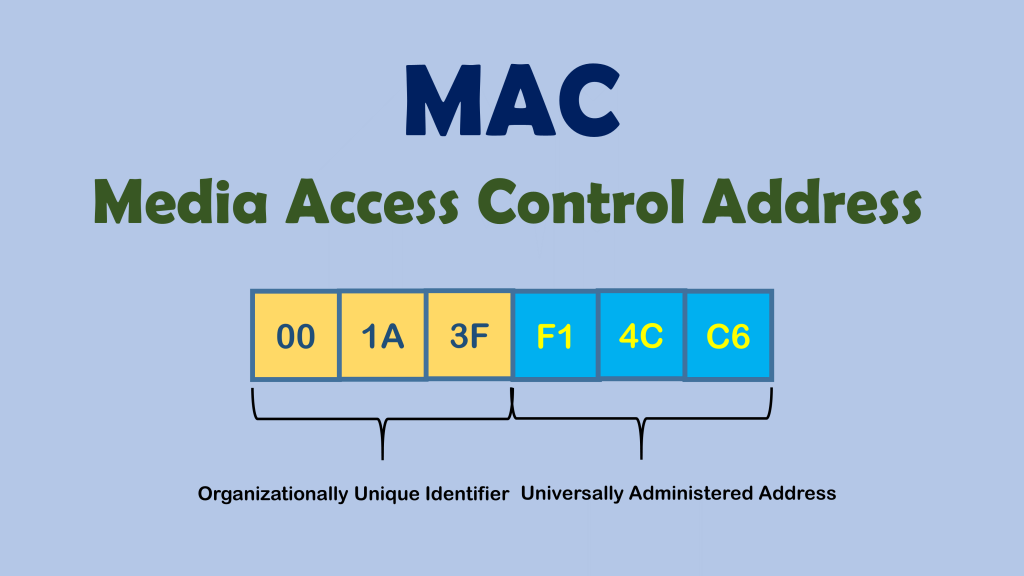
Before we get into the process, let’s know what is a MAC address first. A MAC address is a unique identifier address, present on every device that has Wi-fi. So, on most of the devices like PC, smartphones, laptops, routers, you’ll find this address. Usually, a MAC address is a 12 character long identifier address. It helps other devices to find your device when you want to connect them via Wi-fi. The full form of MAC is Media Access Control. But, most of the users just know it as MAC address. The MAC address is different for every device. As it is a unique address, two MAC addresses can’t be the same by default unless you change them.
Why Change MAC Address on Android Devices?
There are many reasons to change the MAC address of an Android device. First, it’s the security. You can change the address to improve the security of your Android device. A MAC address is a security address used for identifying a particular device. So, sometimes, even a MAC address can be sensitive. That’s why you should take care of the MAC address of your Android device. Because, when a hacker knows about the MAC address of your device, your security can be seriously compromised.
So, when you change the MAC address of your device, you are actually protecting your device from hackers. So, that’s one reason to change the MAC address. The next reason is because of the ISP providers. ISP or Internet Service Providers sometimes assign your IP address to your MAC address particularly. So, you can get the Internet on that device only. When you change your device, you could face a problem. So, you can change the MAC address of your new device and change it to the address of the previous device’s address.
Also, if you browse a public Wi-fi regularly, your security can be compromised. To protect your device from hackers, you should change it. Also, there are some particular Wi-fi networks that work particularly on particular devices. So, if you want to connect to that network, you have to change the MAC address of your device.
Is it Safe to Change the MAC Address of Your Android Device?
Before we get into the main process, first, let’s know if it’s actually safe to change the MAC address of your device or not. If you are wondering the same, then let us tell you that it’s completely safe to change the MAC address of your Android device. After all, it’s your device. So, you can do anything you want on your device. However, if you are living in a region where it is banned to change the MAC address, then you shouldn’t change it.
But, most of the time, it’s completely safe to change the MAC address of your Android device. So, you can change it anytime you want. There’s no need to worry about changing the MAC address of your Android device. It’s safe and you can change the MAC address of any Android device you want.
Before You Change the MAC Address of Your Android Device
Before you change the MAC address of your device, first of all, you should note down the original MAC address of your Android device. Especially, if you have a warranty left on your device, then you can do that. Because sometimes, the warranty center might reject your device because of the MAC address. So, you should change the MAC address of your device and restore it to the original one if you are going to handle your device to the service center.
The second thing that you need to change is to find out if your Android device is rooted or not. Root or superuser permission helps you to change and tweak the system settings on your Android device. And changing the MAC address of your device means tweaking the system settings. So, you should look for if your device has root permission or not. If it hasn’t then don’t worry. Because there are methods to change the MAC address of non-rooted Android devices. And that too is through an easy process that you can do easily.
To check if your Android device has root permission or not, you can simply install the root checker on your device and check if has root or not. There are methods to root Android and unroot Android devices as well. So, you should always choose which method to follow before you change the MAC address of your device. After you decide if you want to change the MAC address of your rooted or non-rooted device, you can proceed to the next steps below.
Below, we have described different methods to change the MAC address of your Android device. So, you can look for your favorite method and change it easily.
How to Change MAC Address on Android (Without Root)
First, let’s talk about how you can change the MAC without rooting your Android device. As we know, rooting an Android device means compromising the security of the device. So, if the device that you are using isn’t rooted, you don’t have to worry about changing the MAC of your device. Because you can do that on non-rooted devices too. So, you don’t have to compromise with the security of your Android device when you want to change the MAC address without rooting the device.
But, before we get into the process of changing the MAC address of non-rooted Android devices, first, let’s talk about the limitations. Yes, as the device is not rooted, you might face some limitations when you are changing the MAC address. The main limitation is nothing but the temporary MAC address changing. Yes, when you are changing the MAC address of a non-rooted Android device, it’s not permanent. Because when you restart your device, the old and default MAC address will be back on your device. So, you have to take care of that. Other than that’s it’s safe and easy to change the MAC address of a non-rooted Android device.
Just follow the below process to change the MAC address of your non-rooted device.
- First of all, download and install the Terminal Android Emulator app on your Android device.
- Open the app on your device.
- You’ll see a terminal where you can put different commands and apply.
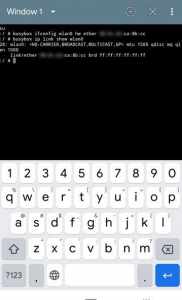
- To change the MAC, enter the ip link show and hit enter first.
- It’ll display the current Wi-fi name of your device. So, you should take note of that.
- Now, enter the ip link set NETWORKNAME hw ether xx:xx:xx:yy:yy:yy and hit enter. The xx:xx:xx:yy:yy:yy is your new MAC address that you can generate randomly.
- That’s it. Now, it’ll the MAC address of your Android device and you’ll get the MAC address that you set.
Note: This method works only on devices with a MediaTek processor. So, if you have an Android device with a Snapdragon or Exynos processor, the method might not work for you. This is another limitation you’ll get with this method. Also, the change is temporary. So, when you restart your Android device, you won’t get the change MAC address. The original MAC address of your Android device will be back.
How to Change MAC Address on Android (With Root)
With 3rd Party App
In this method, you can simply use a 3rd party MAC changer app on your Android device and change the MAC address. It is a very easy method for those who want to change their MAC address frequently. There are many 3rd party apps that you can use to do this. You just have to install the app, grant root permission, enter the new MAC address and that’s it. After that, you’ll be able to get a new MAC address on your Android device with just a single click.
Usually, the MAC changing apps for Android comes free. So, you don’t have to spend any money either. However, you just have to make sure that you are installing the right MAC changing app on your Android device. Because you are giving root permission to the app. And, the app will change your MAC address. So, just make sure that you are using a secure and popular MAC changer app on your Android device. Below, we have described the whole process. So, you can easily follow the process to change the MAC address of a rooted Android device.
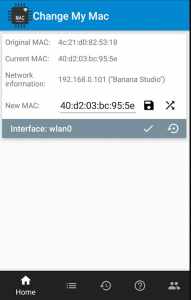
- First of all, download the Change My MAC app on your Android device. It’s a free Android app that you can use to change the MAC address of your device.
- Open the app and you’ll find your current MAC address. Below that, you’ll find the option to put a new MAC address.
- You can either generate a random MAC address or you can set any custom MAC address you want. So, set it and save to change the MAC address on your Android device.
Note: This app doesn’t require Busybox to work on your Android device. However, if you have Busybox, the success rate will be high.
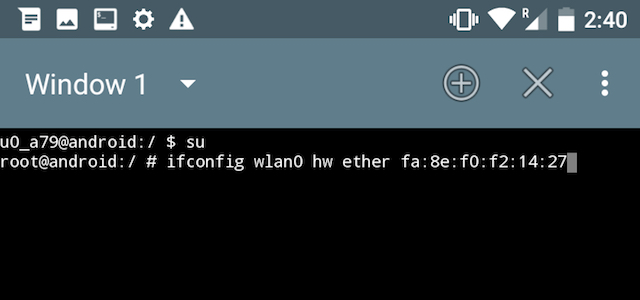
With Terminal Android Emulator app
Here’s the second method to change the MAC address of your Android device. You can use this method and change the MAC address of a rooted Android device permanently. This process is a little bit complicated than our previous process. So, before you use this method to change the MAC address of your device, you should know what are you doing. Just follow the below steps to change the address using Terminal.
- First of all, download and install Busybox on your Android device. If you already have installed Busybox, you can skip the step.
- Now, download and install the Terminal Android emulator app on your Android device.
- Open the Terminal app.
- To show your networkname, type ip link show and hit enter.
- Note down the IP name and type busybox ifconfig eth0 hw ether XX:XX:XX:YY:YY:YY and again hit enter where xx:xx:xx:yy:yy:yy is your new MAC address.
- That’s it. Now, it’ll change the MAC address of your Android device completely.
You can use this method anytime you want and change the MAC address. It’s a little bit complicated, but it’ll help you to change the MAC address permanently.
Final Words
So, guys, I hope this guide has been helpful to you. Above, we have described all the easy process to change the MAC address of your device. So, you can follow any of the processes and easily change the MAC address. It’s not that hard to do that. So, you’ll be able to do that without any issues. If you found this guide helpful, you can share it on your social media platforms. Just use the share buttons below to share this guide. If you have any questions or queries, you can ask them in the comment section below. You can also provide your feedback in the comment section.


 on Samsung Galaxy S9 and S9 Plus")


